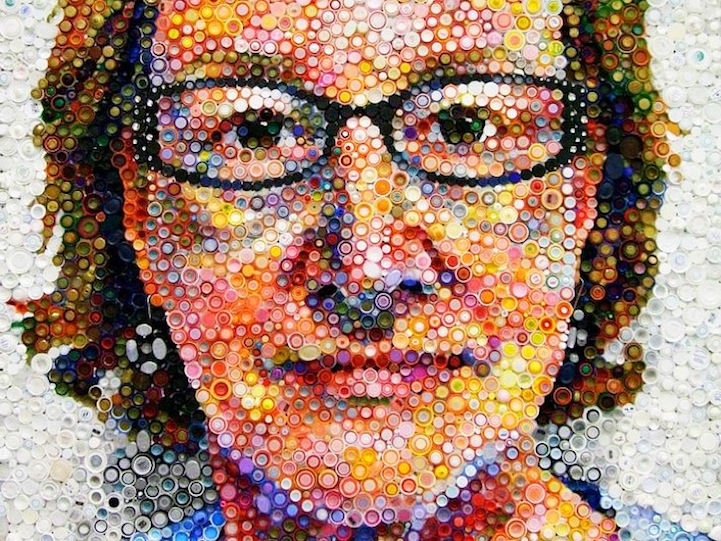
Audrey Hepburn Crayon Art
What You’ll Need:
~ Computer
~ Photo editing program
~ Printer
~ Photo
~ Projector (optional)
~ Pencil/ Eraser
~ Krylon Shimmer Metallic Spray Paint( silver & black)
~ Krylon Clear Acrylic Sealant
~ Masking Tape (non blue)
~ X-acto Knife
~ Crayons (shades of purples and magentas)
~ Hair Dryer with multiple settings
~ Large Piece of Paper & Card-board (to cover workspace inside and outside)
~ Plaid Silver Metallic Paint (optional)
~ Plaid Dark Silver Metallic Paint (optional)
~ Small Paintbrush
~ Picture
How to Make:
1~ First things first,take your image and drag it into photoshop ( or whatever photo editing tool you have). Go to Hue/Saturation and make your image black and white. Then go to your filter gallery and choose the “Cutout” filter. Make sure that the sliders that represent Number of Levels, Edge Simplicity, and Edge Fidelity are at 2. Save the image and print it. If you don’t have a filter like cutout then you can increase contrast until the picture is only 2 tones(black/white). Click here to see photos of this process.
2~ If you have a projector or a “Tracer”, read on, if not click here to learn how you can get your image on your canvas without a projector. Depending on the space you have, this can be easy or a total pain in the butt. Find a table that either has a ton of space, or that is moveable. You’re going to need to be able to move the image and projector in order for it to fit perfectly on your canvas. I use a small bedside table thats super portable.If you dont have a projector, click here to learn how to get your image on your canvas.
3~ Find a wall nearby that you can hang your canvas on or prop it up against. I dont have a ton of space that works for this, so I use my hallway. I prop my canvas up against the wall at the end of the hall on top of a stack of books ( the end of the hall is a mirror so I can’t hang them up 🙁 I add or remove different sized books to get the image height just right. Lol (do what you’ve gotta do!)
4~ Set your table and projector up and turn it on. Now that you can see where the image is, you can adjust the books so that the canvas is at the right height, and move the table/ projector so that the image is the right size to fit on the canvas. Once you have it just right fasten your piece in place, whatever that means for you. ( I use masking tape)
5~ With your pencil start tracing your image starting at one side and slowly migrating to the other. Once your done, double and triple check that you have every single part traced onto your canvas. You want your lines to be dark enough to be seen through the tape, however, you don’t want to make the too dark or you will see it through the crayon.
Note~ I did this piece a little differently that I did with the Jay-Z crayon art. Rather than spray painting the entire background, I chose to leave Audrey white. Having a white background helps give the color a full range of tones. I made a tape stencil like I normally would, but instead of covering the background, I’m covering what will be crayon.
6~ Grab your masking tape and X-acto knife. Starting from the top of her head, lay a strip of masking tape long enough to cover everything within your lines. Take your X-acto knife and cut on the pencil lines shown through the tape. Remove the tape from the areas that will be silver. Continue to do this one strip at a time until the stencil is complete. You want to make sure the pieces overlay a little bit.
7~ Take your canvas outside and place it on your large piece of cardboard or paper. Grab your silver shimmer spray paint and shake it for about two minutes. Then hold the can about a foot away from your canvas and spray the canvas in smooth horizontal motions. You won’t get a smooth uniform look right away and thats ok! Let your first layer dry for a few minutes and then repeat. Do this until your canvas is completely covered and has a consistent tone and density.
8~ Once your silver layer is dry, grab the black shimmer spray paint and shake for two minutes. Pick a corner that you would like to darken and stand nearest to that corner. Starting in the corner, spray about 10-14 inches away moving inward. Do a little bit, and then move to the next corner. I also did the section behind her neck and hair. keep going back and forth between the sections so that one corner isn’t too much darker than the others. You can go as dark as you want or as light as you want.
9~ Once you have it just the way you like, you can spray it with your acrylic coating. Like the spray paint, hold the can about 10-14 inches away from your canvas and spray across your canvas until you’ve covered the entire canvas. let it dry for a minute or two and repeat. I usually do this about three times.
Why do this? ~ You want to add an acrylic coating to your spray paint so you don’t damage it when you create your tape stencil.
Note ~ It will be dry to the touch in a matter of minutes, but you should wait a minimum of two hours before you really start to handle it and bring it inside.
10~ Remove the tape stencil. It should come off really easily, but if you have a hard time picking them up, use your X-acto knife.
11~ Grab your masking tape and X-acto knife. Choose any side of your canvas and apply your first strip of tape, going from one corner to the other. Make sure to cover the entire length of the canvas. When you make your incision with your X-acto knife, make sure to leave a little bit of silver edge showing. The crayon will run onto the silver just enough to ensure a patch of white doesn’t awkwardly show. Remove the tape from the areas that will be covered in crayon. Apply the next piece of tape so it overlaps the previous one just a little. Continue to do this one strip at a time until the stencil is complete.
12~ Cover your workspace with paper or cardboard to protect your belongings.
13~Pick your first color, and turn your hair dryer on HOT and HIGH. Wait till the crayon is nice and melty before you apply it to the canvas. I apply the crayon by rolling the crayon back and forth, between my thumb and index finger while applying heat. If you’re using black, be cautious about how much you apply… A little goes a long way.
14~ Pick out your crayon colors, and de-wrap them using your X-acto knife. I used different shades of purples, magentas, fuschias, and a blue violet, but you can use whatever colors that float your boat. Place your crayons in something so they don’t roll away. I put mine in the top of a shoe box, it works perfectly!
15~ Pick your first color, and turn your hair dryer on HOT and HIGH. Wait till the crayon is nice and melty before you apply it to the canvas. I apply the crayon by rolling the crayon back and forth, between my thumb and index finger, at an angle while applying heat. If you’re using black, be cautious about how much you apply… A little goes a long way.
16~ Add another color next to your previous application. Use the hairdryer as a tool to blend the colors together, and to build up the wax or thin it out. If you feel that its all moving too fast and you can’t control it, turn the intensity to medium, or give it a “Cool Shot”. Continue to add and blend colors until you’ve covered all of the exposed canvas spaces.
17~ Once you’ve finished applying your crayon, carefully start to remove the tape. I suggest going slow to prevent as much chipping as possible. If you want to try and prevent chipping, you can score all the edges of tape with your X-acto knife. You may also see a little bleed through (when the crayon seeps underneath the tape) It’s an unfortunate part of this process, but its ok! We can fix it!
Note ~ Use your X-acto knife to get all of the small, difficult pieces of tape up.
18~ Giving your stencil that extra space should have helped to minimize edge clean up. However, if you have some messy edges or some bleed through, pour a tiny bit of both metallic paints onto a plate. With a small paint brush, carefully touch up the edges. Mix the two shades together if needed to get a perfect match.
19~ Once everything is done, take your beautiful piece of work outside one last time. Spray some acrylic coating over the crayon areas to prevent it from smudging. Let it sit for two hours in a well ventilated area. Hang and Enjoy!
Related Articles
Subscribe now
Get lasest updates in your inbox